|
Calibration - Insitu
|   |
To check if a calibration is necessary, please see chapter Calibration - General.
Calibration:
Depending on the type of probe and plugin you use the calibration process is different. Because of that please read chapter: Binaural - Einschub und AS 03 oder AS 04 or Monaural - Plugin with old Probe (older than 05-2011)
Preliminary working steps:
Prepare the in situ probe for calibration and place it in the same distance from the loudspeaker, as your customer will be later on. If you're using the in situ probe type AS 03 please remove the tube from the probe. The tube calibration is made another working step.
|
Fig.: Drop-down menu of frequency measurement |
Choose 'HIT'-button (for 'Hearing-Instrumen-Testbox') or 'REM'-button (for Real-Ear-Measurement) and the button 'Fr.' (for frequency measurement). Now choose 'Calibration' in the drop-down menu. |
|
|
Now click the 'Go'-button. |
|
Fig.: Step 1 of 3. |
You will be guided through the calibration process step by step. In the first window you will find more informations and hints about the preliminary working steps for the calibration. Please choose one of the following: Start all measurements succeedingly, if you want to perform each calibration step succeedingly after the other. Individual Request, if you want to perform only some of the calibration steps, or want to do some steps multiple times, or if you want to start or stop the calibration at a certain step. The option 'Start all measurements succeedingly' is recommended for the daily working process |
|
Fig.: Sound field calibration part 1 |
First measurement Different signals will be emitted one after another on the loudspeakers. They will be tuned in volume until the right sound level is reached, |
|
Fig.: Sound field calibration part 2 |
Second measurement This test is disabled in default settings. This can be changed in the setup. If it's turned off, it is not possible to measure in situ with pure tone signals. Successively all possible sound signals are emitted over loudspeakers and in turn the loudspeakers are calibrated automatically. |
|
Abb.: Calibration of FFT values. |
Third measurement The same test as number two will be performed with noise as emitted sound signal. |
The calibration is now finished. You can close the window by clicking Ok. If you chose 'Start all measurements succeedingly' the window will close automatically.
Please keep in mind that you have to do a second calibration, if you're using two in situ probes!
Possible problems / errors during the calibration process:
If the microphones are defect or the connecting cable is plugged-off, the calibration will deliver wrong datas. The ACAM system will then emit too high sound levels.
|
|
During the calibration process, this message may appear. This means the emitted signal was too soft, although the highest possible calibration value was used. This might have different reasons: - The sound card could be defect - the cable of the sound card might be disconnected If this message still appears, after you have checked all the cable connection you should contact our hotline. |
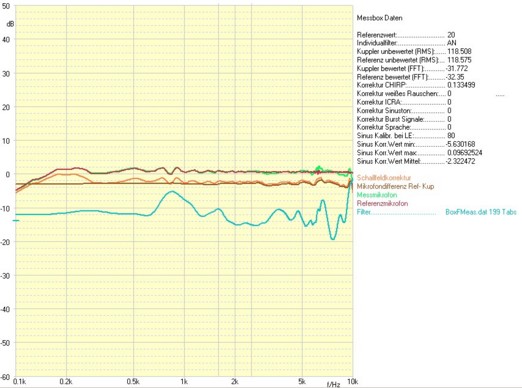
If the calibration was performed correctly, a flat curve must be seen on the screen. If not, the calibration must be done again. If the curve is still not flat, please contact our support hotline.
It may happen, that the calibration aborts, if the sorrounding noise is too loud, or the measured levels exceed a defined limit. These limits can be changed in the setup of the ACAM.
In the 'Calibration' tab of the setup, you can adjust several other parameters depending the calibration. Additionally you can review the results of the calibration.

Fig.: Calibration curves
These curves provide you with informations about the quality of the used signal transducers (microphone and loudspeakers), but also about the calibration itself.