|
Directionality - General
|   |
Directionality tab:
The Directionality tab can be used to playback manufacturer software, to present customized sounds, or to play sounds from the integrated sound library.
The directionality tab supports two with together four channels.

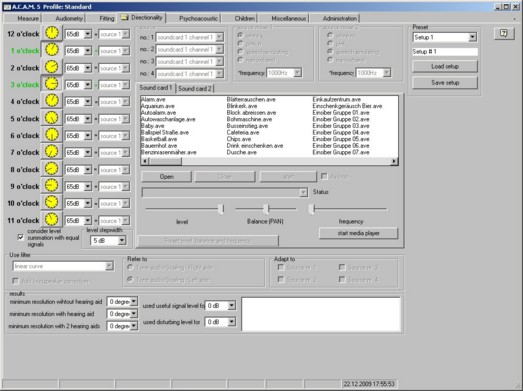
Figure 189: Loudspeakers enabled; configurations are locked.

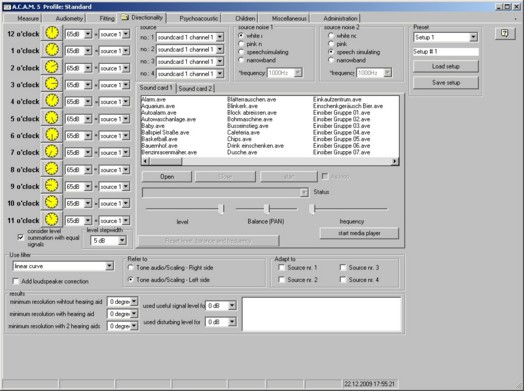
Figure 190: Loudspeakers disabled. Changes to the configuration can be made.
Possible Channel Configurations:
The ACAM System has four channel options.
The following signals can be assigned to each channel (Figure 191):
|
Figure 191: Signal options that can be assigned to each channel |
The ACAM System has four channel options.
The following noises can be assigned to each noise source (Figure 192):
|
Figure 192: Noise options that can be assigned to each noise source |
Sources need to be assigned to each loudspeaker prior to activating them (Figure 193).
|
Figure 193: Screen demonstrating that sources can be assigned to loudspeakers |
An Example:
Set soundcard 1 as a stereo signal for the angular left and angular right loudspeakers:
|
|
Select soundcard 1 channel 1 in the no.:1 slot. Select soundcard 1 channel 2 in the no.: 2 slot. |
|
|
Assign source 1 to the angular left speaker (2 o'clock) and source 2 to the angular right speaker (10 o'clock). |
|
|
Enable the loudspeakers by clicking on the corresponding clock icons. |
The ACAM System Sound Playback Option:
The ACAM System is capable of playing sound files through a small sound library built into the software (Figure 194). The ACAM System is only capable of playing audio wave files. A special program such as Windows Media Player is required to play other audio files such as mp3 files.
|
Figure 194: The ACAM System Sound Playback Option |
Selection Options within the ACAM System Sound Playback Option Screen:
|
|
Selection of the soundcard to be used during testing. Sound card 1 is the default setting in the ACAM System software. Sound card 2 is only activated when two or more sound cards are built into the computer being used. |
|
|
Selection list of the available sound files. Double click on the sound file you would like to play from the list shown on the left. Once selected the sound file will appear in the play list screen. |
|
|
Opens a dialog. This allows any of the wave files to be selected and started. Selection of <As loop> causes the file to run in a continuous loop. When the file ends the playback does not stop, but begins again from the beginning. |
|
|
Closes the selected file. |
|
|
<Stop> or <Play> can be selected for the loaded file. |
|
|
The loaded files will appear in a list. Multiple files can be played simultaneously and each file can be configured independently.
|
|
|
The volume of the selected file can be adjusted. 0 = maximum loudness, -10000 = minimum loudness |
|
|
The balance of the selected file can be adjusted. When a file is selected it is always played in the stereo format, even if the file is only available in a mono format. Stereo format means that the file is always presented from both channels of the sound card. The balance control slider provides the option to reduce the sound playback from one of the channels.
|
|
|
The sampling rate of the selected file can be adjusted by moving the slider left or right. Adjusting the sampling rate will cause the signal to be played at a faster or slower rate than the original signal. |
|
|
Starts the Microsoft Media Player. This provides the ability to play videos, DVDs, sound files, MP3 files, and other options through the ACAM System. If the loudspeakers and sources are configured correctly, the selected sound will be presented through the ACAM System loudspeakers. |
|
|
Provides the ability to change the level, balance, and frequency settings back to the ACAM System default settings. |
The Directionality Options in Detail:
|
|
Loudspeaker on/off switch:
|
|
|
Source definition: select the signals to be played through each noise source. |
|
|
When noise source 1 or noise source 2 is selected the type of noise to be played can also be selected. |
|
|
For loudspeakers that are set-up to present identical signals a level summation may be enabled. This would cause the adjusted intensity level to be played from each loudspeaker at equal levels. |
|
|
The intensity level increments of the loudspeakers can be selected. The default increment setting is 5 dB; 1 dB or 10 dB can also be selected. |
|
|
The type of spectral compensation can be selected through this drop down menu. For further information of the effect of the spectral compensation please refer to the section: "spectral compensation." |
|
|
The calculation of the spectral compensation is performed based on the selected air conduction threshold (right side or left side). |
|
|
The spectral compensation calculation can be applied to one or more of the four available sources (channels). This means that the signals can be manipulated to be distorted or not distorted. |
|
|
A loudspeaker correction can be selected: this makes the frequency response of the loudspeaker linear. |
|
|
Within the Preset Section, up to four default setups can be established. Select the setup (1-4), make the proper adjustments and select <save>. The adjustments made will be saved to the selected setup (1-4) and may be accessed at any time. A personalized description can also be assigned to each setup (1-4). |