|
Fitting – Setup
|   |
To access the Fitting Setup Menu select <SET> under the Fitting sub-tab.
Fitting setup: Channel selection tab
Under the Channel selection tab personalize the settings for the hearing aid fitting. The user does not always have control over the settings; for example once data has been collected during the hearing aid fitting, channel adjustments can no longer be made (Figure 157). It is important to adjust the channel settings prior to starting the hearing aid fitting (Figure 157).
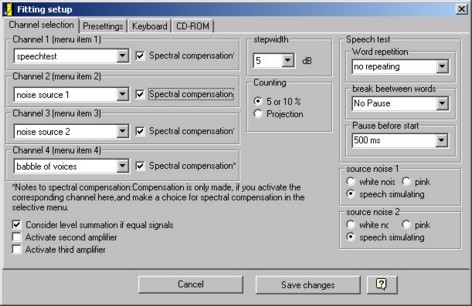
Figure 157: Fitting Setup window: data for the hearing aid fitting has not been collected and adjustments can be made
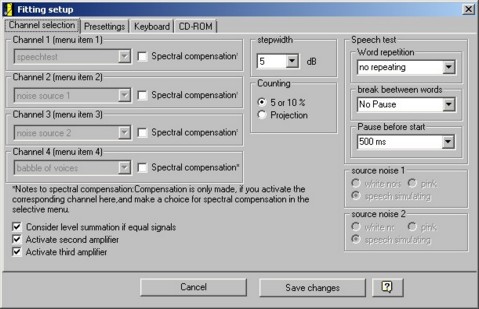
Figure 158: Fitting Setup window: data for the hearing aid fitting have been collected and adjustments cannot be made
Channel Selection for Channels 1 to 4
Different signals can be assigned to each of the four available channels. The signals you select appear in the fitting selection menu.
The following signals are available for each of the four channels:
|
Freiburg Speech Test |
Numbers and words from the Freiburg Speech Test (according to DIN 45621) |
|
Noise Source 1 |
Noise source 1: select from white, pink, or speech noise. |
|
Noise Source 2 |
Noise source 2: select from white, pink, or speech noise. |
|
Babble of voices |
Voice babble is presented. |
|
External On Aux 1 Channel 1 |
External Signal through Input 1 channel 1 of the ACAM System. This input is normally open, or a second soundcard is connected. |
|
External On Aux 1 Channel 2 |
External Signal via Input 1 channel 2 of the ACAM System. This input is normally open, or a second soundcard is connected. |
|
External On Aux 2 Channel 1 |
External Signal via Input 2 channel 1 of the ACAM System. This input is normally open, or a second soundcard is connected. |
|
External On Aux 2 Channel 2 |
External Signal via Input 2 channel 2 of the ACAM System. This input is normally open, or a second soundcard is connected. |
|
CD via Aux 1 Channel 1 |
CD playback enabled. Channel 1 of the Aux input 1 is used. |
|
CD via Aux 1 Channel 2 |
CD playback enabled. Channel 2 of the Aux input 1 is used. |
|
CD via Aux 2 Channel 1 |
CD playback enabled. Channel 1 of the Aux input 2 is used. |
|
CD via Aux 2 Channel 2 |
CD playback enabled. Channel 2 of the Aux input 2 is used. |
When you present noise through more than one loudspeaker it is necessary to use two different noise sources. The same noise source cannot be played through two different speakers.
The signals selected in <SET> are displayed in the selection menu assigned to the loudspeaker being used. Referring to Figure 159, the selected speechtest is set in channel 1, the noise source 1 is set in channel 2, the noise source 2 is set in channel 3, and the babble of voices is set in channel 4. Changes made to <SET> would result in corresponding changes to the loudspeaker channels.
|
|
Figure 159: Organization of selected signals in the four loudspeaker channels
Stepwidth
Select the loudspeaker level increments to be used for the fitting. Increments can be selected from 1 dB to 10 dB and typically increments are set at 5 dB (Figure 160).
|
|
Figure 160: Image of increment levels which can be set for the loudspeaker levels
Level Summation
When several loudspeakers present the same level signal a total level exceeding the adjusted level may occur.
|
|
To avoid this select <Consider level summation if equal signals>. This reduces the individual levels of the loudspeakers to ensure that the total levels correspond to the adjusted levels. This function is helpful to ensure that too high of levels are not presented during the fitting.
Counting
Counting can be done by selecting <5 or 10%> or <Projection> (Figure 161).
|
|
Figure 161: Counting options
Activate Second Amplifier/Activate Third Amplifier
If a second and third power amplifier are built in the unit, they can be switched on or off in the control unit of the system. This would permit a better overview of the operation.
When the second amplifier is activated 8 loudspeaker symbols appear. When the third amplifier is activated 12 loudspeaker symbols appear.
Speech Test
|
Word repetition |
Enables word repetition. One repeat means that an item is repeated twice. Default is set for no repeats. |
|
Break between words |
Inserts pauses between item repeats. If the word repetition option is enabled a pause of 500 ms will occur. Default is set for no pauses. |
|
Pause before start |
Delays the start of the first speech event of a group. This may be beneficial when testing in noise; the noise event would be activated by selecting <go> and the first item would be presented based on the pause length that is set. If enabled, a delay of 1000 ms will occur. Default is is set for no delays. |
Source noise 1 and Source noise 2
|
White noise |
When selected, white noise will be presented. |
|
Pink noise |
When selected, pink noise will be presented. |
|
Speech noise |
When selected, speech noise will be presented*. |
*Speech noise is preferred for speech testing, as the noise and speech are matched in terms of spectral distribution characteristics.
Fitting Setup: The Presettings tab
Under the Presettings tab select specific "first fit" fitting settings.
Adjustments can be made here for a patient's initial fitting. When a series of fittings have been saved for a patient, the previously saved settings will be used for the fitting.
When a fitting is deleted from the ACAM System, the presettings will also be deleted.
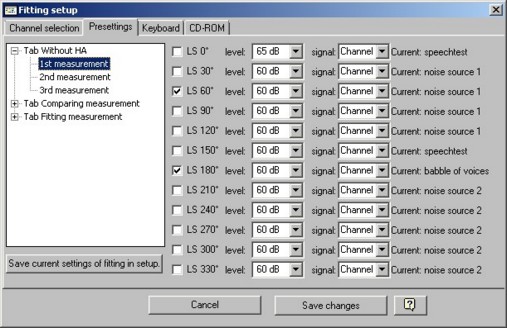
Figure 162: Presetting
There are two ways to change the Presettings (Figure 162):
Fitting Setup: Keyboard tab
A software interrupter is incorporated into the ACAM System. Settings in the Keyboard tab can be adjusted in this screen to determine which keys will result in specific software interrupter functions (Figure 163).
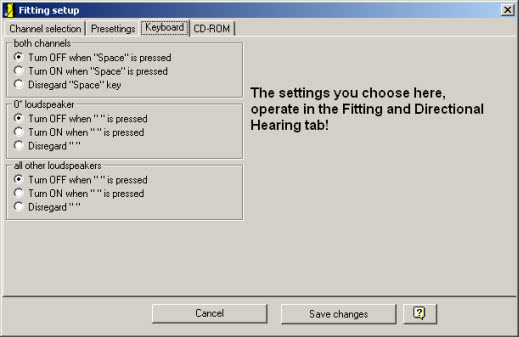
Figure 163: Fitting setup Keyboard tab configuration
Select between three loudspeaker and channel options:
|
Turn OFF when "" is pressed |
Switches the signal OFF as long as the designated key is pressed. The signal is always ON and can be switched OFF by pressing the same designated key. |
|
Turn ON when "" is pressed |
Switches the signal ON as long as the designated key is pressed. The signal is always OFF and can be switched ON by pressing the same designated key. |
|
Disregard "" |
The designated key function is disabled. Pressing the key has no effect. The signal is always switched ON. |
Three different keys enable the signal interrupter function:
|
Space bar |
Affects all loudspeakers. |
|
Comma key |
Affects the 0° loudspeaker. Speech is the typical signal selected for this function. |
|
Point key |
Affects all loudspeakers except the 0° loudspeaker. Noise is the typical signal selected for this function. |
Fitting Setup: CD-ROM tab
The ACAM System has the capabilities to play audio CDs.
A series of common audio CDs are integrated in the ACAM System database. Control files are provided for some of the audio CDs integrated into the system, allowing for single word playback. To play a CD in the ACAM System, insert the CD into the CD-ROM drive before opening the ACAM System software.
Under the Fitting setup CD-ROM tab minimal settings need to be configured in order for CD playback to function (Figure 164).
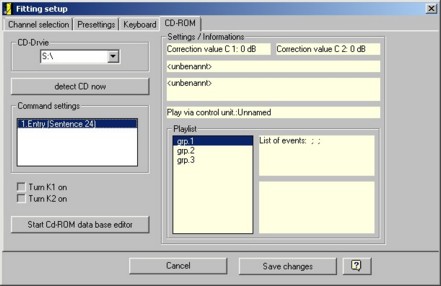
Figure 164: Fitting setup CD-ROM tab configuration
For a detailed description of the CD-ROM implementation, please refer to the section: "CD-playback"
Close the window by performing one of the following options:
|
Click <cancel> |
Changes in settings are not applied. The audiometer keeps the same adjustments as it had at the start of the setup. |
|
Click <apply> |
Changes in settings are applied. The audiometer runs now with the changed parameters. |
|
Click X on the upper right corner |
A message prompt appears with the option to either apply or not apply the changes.The message prompt opens up in a new window and states Take over the data? Click on yes to apply the changes. Click on no to discard the changes. |