|
Scaling (AHA) - Introduction
|   |
For history about scaling (AHA) please refer to the "Psychoacoustics Introduction" section.
The Functions of the Psychoacoustic tab Button Bar:
![]()
Figure : Button bar for the psychoacoustic tab.
Measuring Mode, Edit Mode and Target Values Mode:
Depending on the selection of the three buttons: <entry>, <start>, or <target> different screen displays and control functions are enabled.
|
|
<entry> is pressed: You are in the edit mode. Curves can be entered or deleted. |
|
|
<start> is pressed: You are in the measuring mode.Select a test frequency and level by clicking the mouse. |
|
|
<target> is pressed: From the measurements target values can be calculated. Typically these are the targets created for hearing aid adjustments. |
For more information refer to the section: "Operation."
Selection of the ear(s) for measurements:
In the measuring mode the measuring signal is presented on the selected side.
|
|
The right side is enabled. |
|
|
The left side is enabled. |
|
|
Both sides are enabled. |
The entry is performed based on the selected side: red for right, blue for left and black for both sides.
Measuring with and without a hearing instrument:
|
|
Measurements with a hearing aid is enabled. |
|
|
Measurements without a hearing aid is enabled. |
Measuring with a hearing aid:
Target values cannot be directly displayed because the acoustics of the ear canal are unknown. Place the hearing aid into the test box after a measurement to determine the gain measured in the ear canal. Following test box measurements, targets can be seen within the target values mode or within the measure tab.
Measuring without a hearing aid:
Target values are displayed as insertion gain values for measurements without a hearing aid(s).
Setup and Printing:
|
|
<set>: to access the setup menu. <print>: to print information from the measurements. |
For further information on printing and the setup menu please visit: "Operation" and "Printing."
General Information about the AHA! Scaling Measurements:
Differences are established between measurements with the hearing aid(s) or without the hearing aid(s).
Measurement without hearing aids:
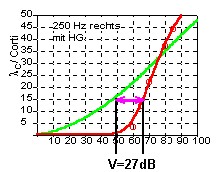
Data from measurements without the hearing aid(s) can be calculated into insertion gain curves (Figure 200). Insertion gain curves are equal to the difference between the normal hearing loudness function curve (green) and the individual loudness function curve (red) at the corresponding frequency and level.

Figure 200: Calculation of insertion gain
Measurement with hearing aids:
Gain needs to be determined when a measurement is performed with a hearing aid in the ear. Targets are only displayed in the ACAM System when the gain of the hearing aid(s) through test box or real ear measures has been determined.
Different symbols on each curve can be used to differentiate between targets.

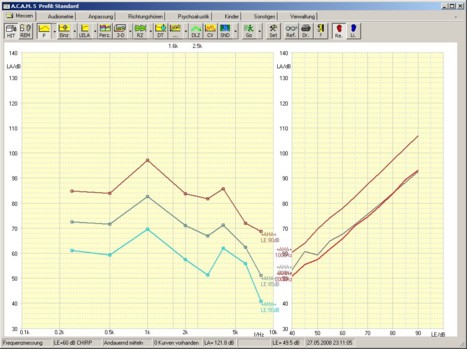
Figure 201: Target constructions made with hearing aid(s), with the label +AHA+

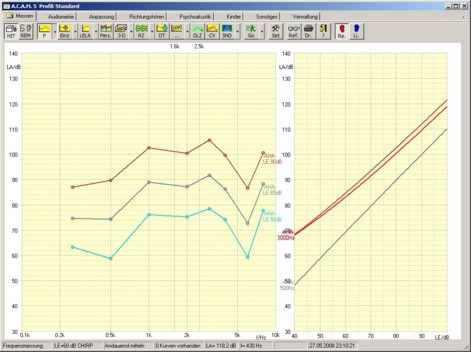
Figure 202: Target constructions made without hearing aid(s), with the label -AHA-
To enable the target curves in the measurement tab you have to open the save dialog box and choose <target curve selection>.
|
Figure 203: Target gain selection display |
Ways to show the target values: Select:
Under In frequency diagram and In Input/Output diagram you may enable the input level and the frequencies you want to view. Under Target value of percentile measurement you can select scaling values to view as percentage values (Figure 203). |