|
Tone Audiometry – Operation
|   |
Depending on the setup of the tone audiometry, operations are performed using a mouse and/or keyboard. All settings available for audiometry can be changed using the <set> button.
Go button disabled (edit mode) or enabled (measuring mode):
|
|
Go Button disabled: Edit Mode
|
|
|
Go Button enabled: Measuring Mode
|
Edit Mode:

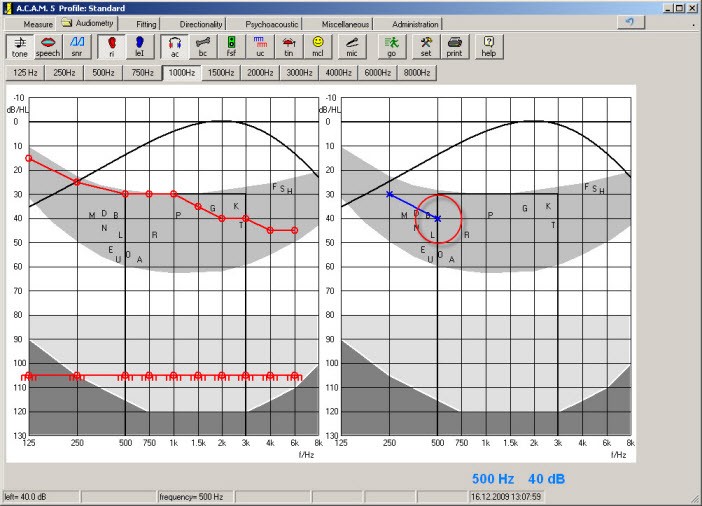
Figure 124: the ACAM System in edit mode
All buttons are unlocked in the edit mode. Click on the right or left diagram to enter the audiogram. In Figure 124, the (left diagram) threshold at 500 Hz was clicked at 40 dB. Enter the measured value by left-clicking on the appropriate level in the left and right diagrams.
For assistance, "Edit mode 500 Hz 40 dB" is shown in the status field corresponding to the current position of your mouse cursor.
Enable a button in tone audiometry by selecting one of the following:
|
|
<AC>: air conduction threshold |
|
|
<BC>: bone conduction threshold |
|
|
<FSF>: free field |
|
|
<UC>: uncomfortable level |
|
|
<Tin>: tinnitus |
|
|
<MCL>: Most Comfortable Level |
Menu options in the edit mode (Figure 125):
|
Delete Item |
Delete the measuring point that was clicked. |
|
Delete Curve |
Delete the curve of the enabled measurement. Only the curve clicked on in the diagram is deleted (i.e. right or left). |
|
Delete Diagram |
Delete the complete diagram of the side clicked. |
|
Set: not heard |
Set the value that was clicked on to “not heard.” |
|
Set masking |
Enter the clicked value as the masking level for the non-test ear. |
|
Delete masking |
Delete the clicked value on the non-test ear. |
|
Export to Word |
Export the complete diagram as a graphic to Word and launches Word (provided that Word is installed on the computer). |
|
Export to Excel |
Export the complete diagram to Excel. The individual diagram values are exported (provided that Excel is installed on the computer). |
|
Comments for audiogram |
A window opens displaying comments about the measurement. Comments can also be edited in this window. |
|
Change nothing |
No changes are made. |
|
Figure 125: Menu in the edit mode |
Right click on diagram to display a menu with a series of selections. |
Measuring Mode:
|
|
<ri>: Right side enabled. The test ear is the right and the non-test ear is the left. |
|
|
<le>: Left side is enabled. The test ear is the left and the non-test ear is the right. |
|
|
<AC>: Air conduction threshold. The stimulus is presented to the test ear and the non-test ear via headphones.* |
|
|
<BC>: Bone conduction threshold. The stimulus is presented to the test ear using the bone conductor and to the non-test ear using headphones.* |
|
|
<FF>: Free field. Test ear free field loudspeaker #1 (=0°) and non-test ear nothing.* |
|
|
<UCL>: Uncomfortable level. Air conduction using headphones to the test ear and the non-test ear.* |
|
|
<Tin>: Tinnitus. Air conduction using headphones to the test ear and the non-test ear.* |
|
|
<MCL>: Most Comfortable Level. Air conduction using headphones to the test ear and the non-test ear.* |
* Transducers and used measuring signal may be adjusted in the settings of the tone audiometry.
![]()
Figure 126: Selection of the measuring method showing the following selection: tone audiometry, left ear test side, and air conduction.
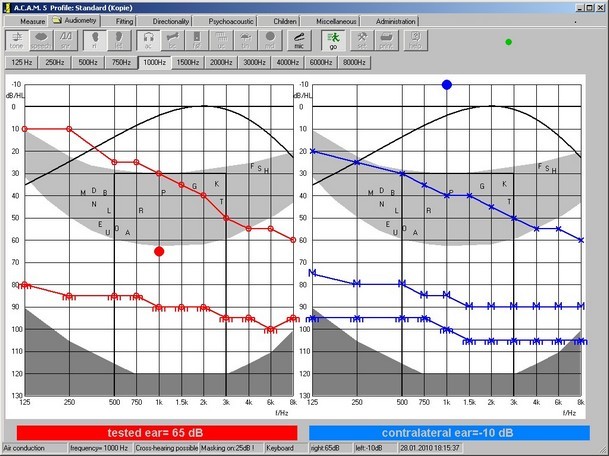
Click <Go> or press the Enter key to start the actual measurement. Most of the available buttons are now disabled. Only the frequency selection button, the <Mic> button and the <Go> button are still available for selection.

Figure 127: ACAM in measuring mode
It is possible to change the test ear and the non-test ear separately or together. Below is a table of the individual adjustment possibilities.
Overview of the Keyboard Code (Operation via Keyboard):
Frequency Selection:
|
|
Direct frequency selection: 125 Hz – 8000 Hz. |
|
|
Decrease the frequency. |
|
|
Increase the frequency. |
Level Selection:
|
|
Decreases level of the test ear. |
|
|
Increases level of the test ear. |
|
|
Decreases level of the non-test ear. |
|
|
Increases level of the non-test ear. |
|
|
Decreses level on both sides. |
|
|
Increase level on both sides. |
Interruption:
To communicate with the patient during testing, interrupt the presentation using the space bar at any time (a different key may be designated for interruption, refer to Setup Menu).
|
|
Turns signal on/off on both channels without closing the measurement. |
|
|
Turns signal on/off on the test ear without closing the measurement. |
|
|
Turns signal on/off on the non-test ear without closing the measurement. |
Miscellaneous:
|
|
Confirm and save value or start measurement. |
|
|
Close Measurement (value is not saved). |
|
|
Delete value. |
|
|
Set value to not heard. |
|
|
Switch the talk back microphone on/off. |
Overview of mouse commands (using the mouse):
|
Moving the mouse over the diagram field |
The point of the test ear is set to the mouse position. |
|
Mouse wheel (between left and right mouse key) |
The point of the non-test ear is increased or decreased. |
|
Left-click using mouse |
Measuring point is saved. |
|
Right-click using mouse |
Measuring point is deleted. |
|
Hold down the left mouse key longer than 1 second
|
Current position is set to “not heard.” |
Talk Back:
At any time in the measuring and edit mode, click the <mic> button to enable the microphone. This allows the user to communicate with the patient. The level selected in setup is used. Use the keyboard or mouse to change the presentation level. The microphone signal is presented using the air conduction headphones.
When talk back is enabled during a measurement, the measurement is interrupted and the microphone is enabled. When the microphone is disabled, the measurement continues at the previously interrupted point.
Printing:
Please refer to section: "Printing.”